Create a Chat Widget Agent
Vectorize provides embeddable chat widgets that allow you to add AI-powered search and Q&A capabilities directly to your website or application. These widgets connect to your data pipelines and can be embedded with just a few lines of code.
Prerequisites
Before creating a chat widget agent, ensure you have:
- An active Vectorize account with a paid plan (Starter or higher)
- At least one pipeline created with indexed documents
- A website or application where you want to embed the widget
Step-by-Step Guide
1. Navigate to Agents
On the left navigation bar, click on Agents.
2. Create a New Agent
Click on the New Agent button in the top right corner.
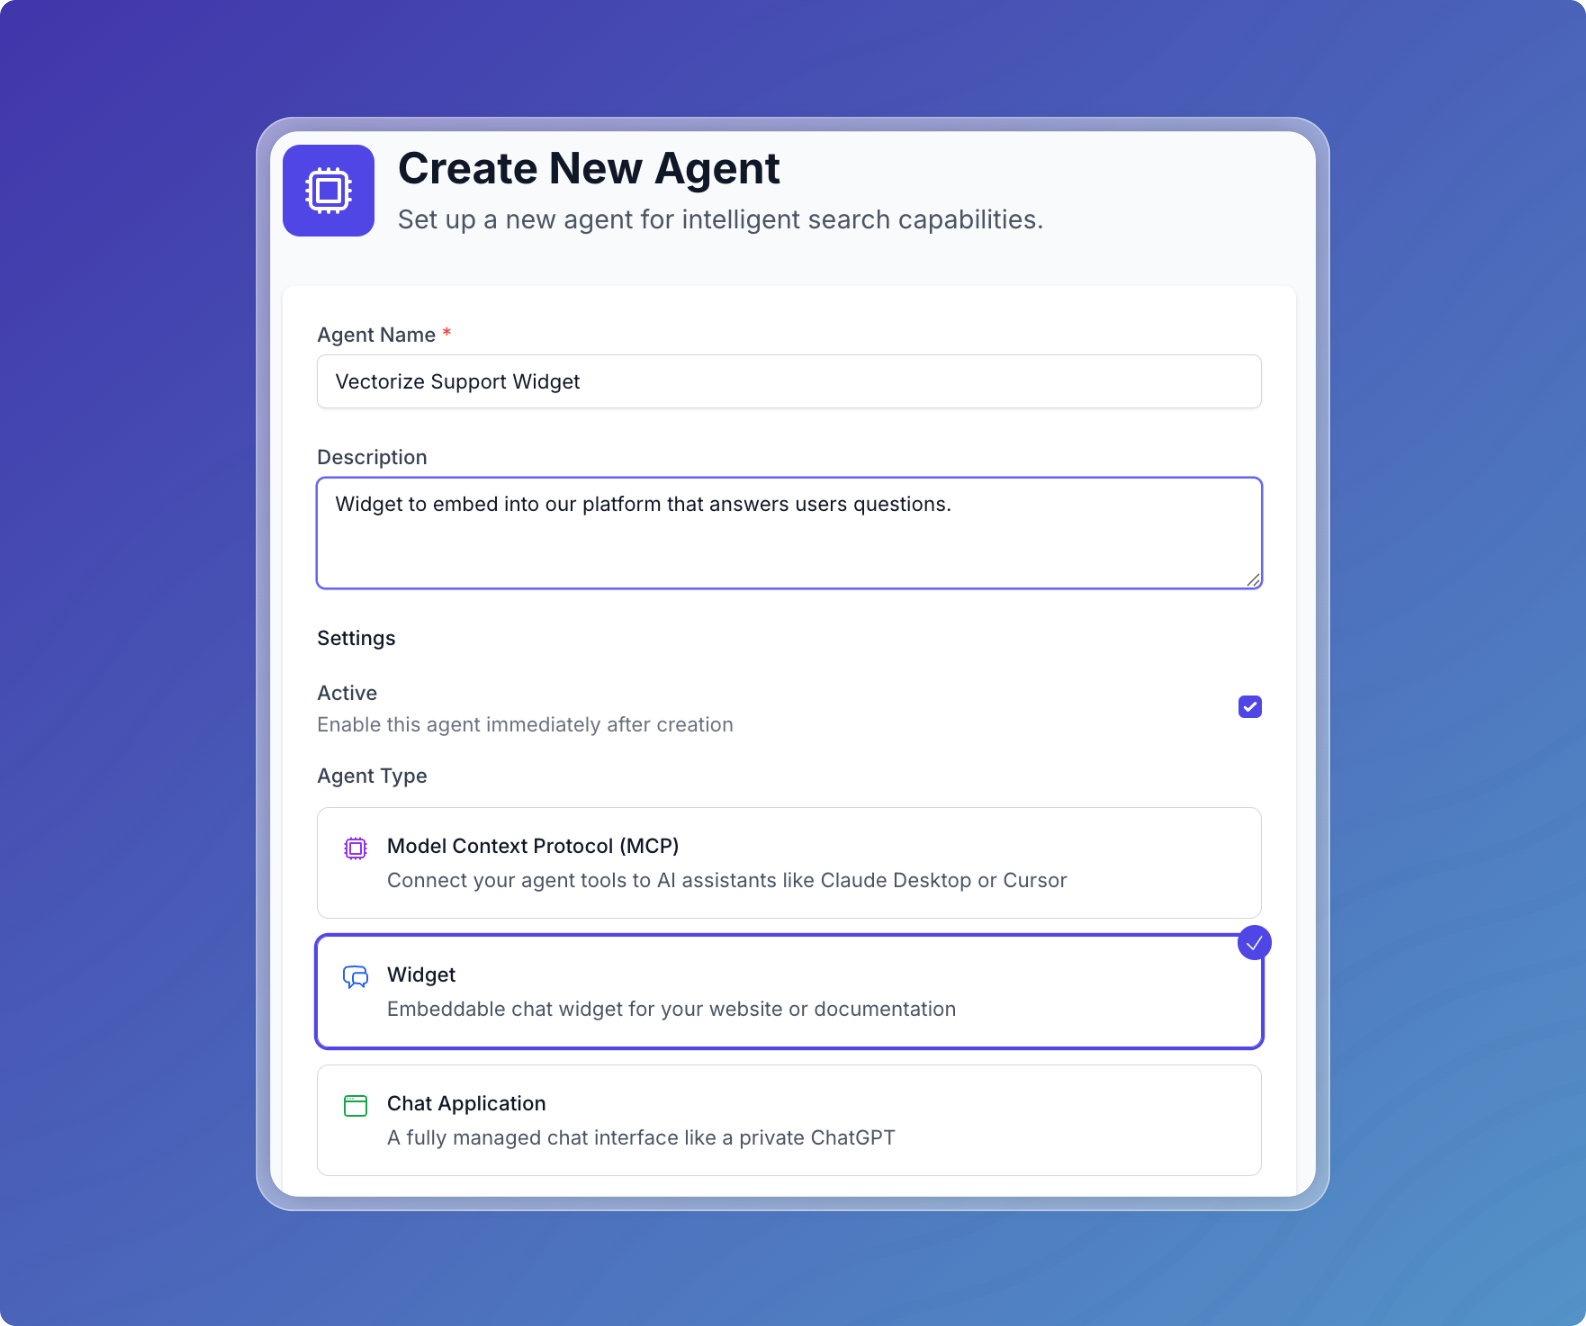
3. Configure Agent Settings
Basic Information
-
Agent Name: Enter a descriptive name for your widget (e.g., "Support Chat Widget")
- Must be between 3-50 characters
-
Description: Optionally describe the widget's purpose
- Maximum 200 characters
- Example: "Customer support widget for documentation site"
-
Active Status: Toggle whether the widget should be active immediately
- Enabled by default
- Can be toggled later from the agent details page

Select Widget Type
Select Widget as the agent type. This enables:
- Embeddable chat interface
- CORS configuration for cross-domain access
- Single model configuration
- Password-protected access
Note: Widgets require a paid plan. If you're on the free plan, you'll see an "Upgrade Required" message with a link to upgrade.
4. Configure LLM Model
Widgets use a single AI model for all interactions. This simplifies configuration and ensures consistent responses.
Model Selection
-
Select AI Platform: Choose from:
- Built-in (Vectorize-provided models, no API key needed)
- Your connected AI platforms (OpenAI, Anthropic, AWS Bedrock, etc.)
-
Choose Model: Select the specific model:
- For Built-in: Llama 3.3 70B, Qwen 3 32B, etc.
- For OpenAI: GPT-4o, GPT-4.1, o3 models, etc.
- For Anthropic: Claude Opus, Sonnet, Haiku variants
-
Add LLM Provider: If you don't see your desired platform, click "Add LLM Provider" to connect a new one
5. Set System Prompt
Define your widget's behavior and personality with a system prompt:
For example, if your widget is for customer support on a documentation site, you might use:
You are a helpful customer support assistant embedded on our documentation website.
Answer questions about our product features and help users navigate our documentation.
Be concise and friendly. Always provide relevant links when available.
If you don't know something, politely say so and suggest contacting support.
Best Practices for Widget System Prompts:
- Keep responses concise (widgets have limited space)
- Include your brand voice and tone
- Specify the widget's context (e.g., "embedded on our pricing page")
- Define boundaries (what the widget should and shouldn't discuss)
Additional configuration:
- Temperature (0-2): Controls response creativity
- 0.3-0.5: Recommended for factual support widgets
- 0.7: Default, balanced responses
- 1.0+: More creative, varied responses
- Max Tokens: Maximum response length
- Default: 2048 (good for most widgets)
- Consider lower values (500-1000) for more concise responses
- Maximum: 128000
6. Configure Authentication
Widgets require authentication to prevent unauthorized usage of your resources.
Admin Credentials
Set credentials that will be used to authenticate the widget:
-
Admin Username: Create a username for widget authentication
- This will be embedded in your widget code
- Choose something unique but not sensitive
-
Admin Password: Create a strong password
- At least 8 characters
- Must include: one letter, one number, one special character
- This will be hashed and embedded in your widget code
-
Confirm Password: Re-enter the password
Security Note: While these credentials are embedded in your website code, they are hashed and only grant access to this specific widget's functionality, not your Vectorize account.
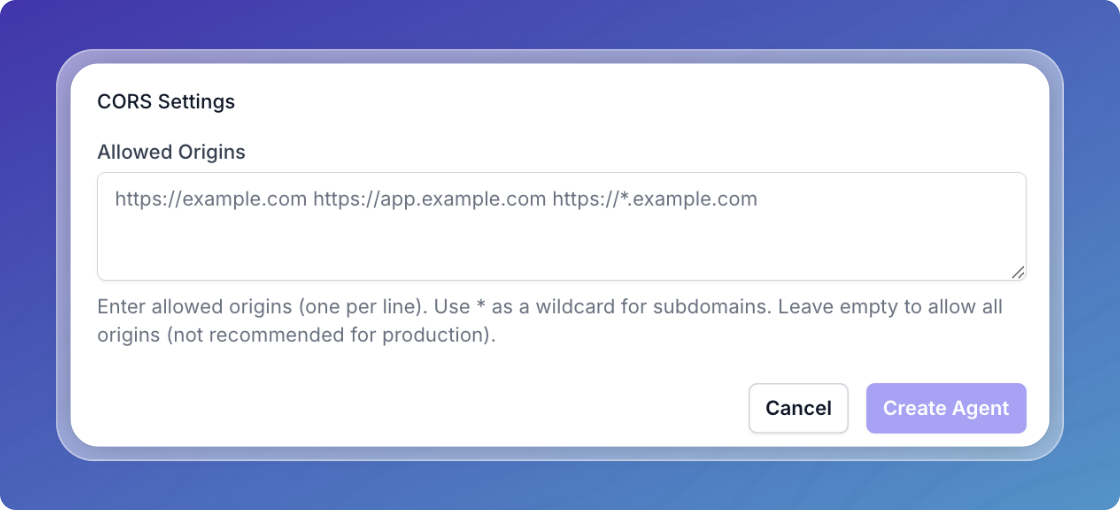
7. Configure CORS Settings
CORS (Cross-Origin Resource Sharing) settings determine which websites can embed your widget.
Allowed Origins
Enter the domains where you'll embed the widget (one per line):
https://example.com
https://app.example.com
https://docs.example.com
CORS Configuration Options:
-
Specific Domains (Recommended for production):
https://mywebsite.com
https://www.mywebsite.com -
Wildcard Subdomains:
https://*.example.com -
Development Environments:
http://localhost:3000
http://localhost:8080
https://staging.example.com -
All Origins (Not recommended):
- Leave empty to allow all origins
- Only use for testing or public widgets

8. Create the Widget
Review your configuration and click Create Agent to create your widget.

Connect Your Pipeline
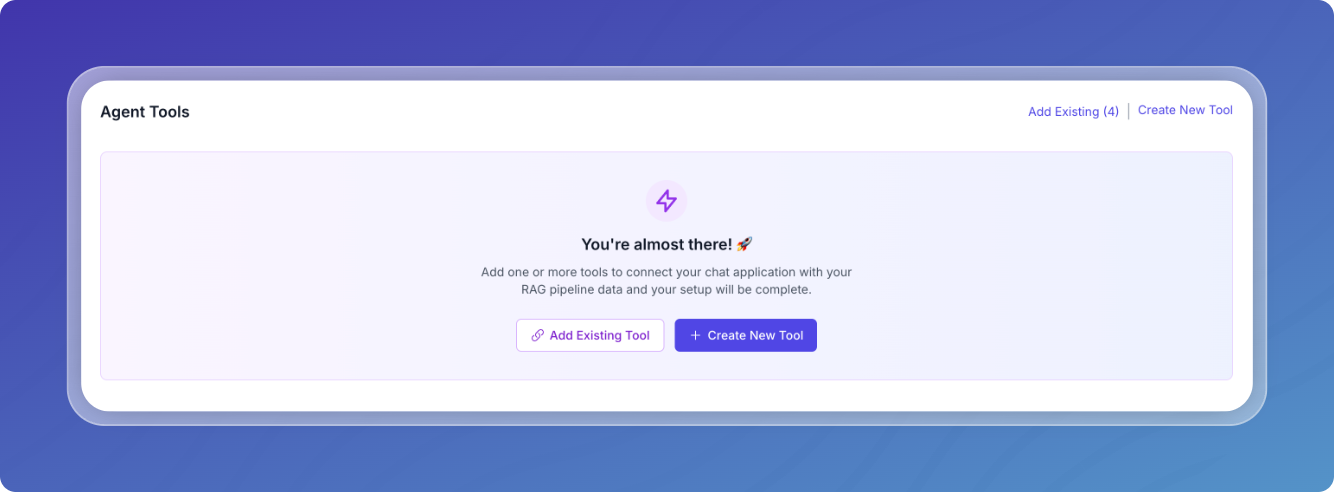
After creating the widget, connect it to your data sources using tools.
1. Navigate to Tools
From the agent details page, click on the Tools tab or navigate to the tools section.

2. Create or Add Tools
Option A: Create New Tool
- Click New Agent Tool
- Configure the tool:
- Tool Name: Descriptive name (e.g., "search_documentation")
- Description: What the tool does
- Pipeline: Select your document pipeline
- Parameters: Define search parameters
- Filters: Add metadata filters if needed
Option B: Add Existing Tools
- Click Add Existing Tools
- Select from workspace tools
- Add selected tools to your widget
3. Save Tool Configuration
Click Create Tool or Add Tools to connect your pipeline to the widget.

Embed Your Widget
Once configured, you'll receive embedding instructions from the agent details page.
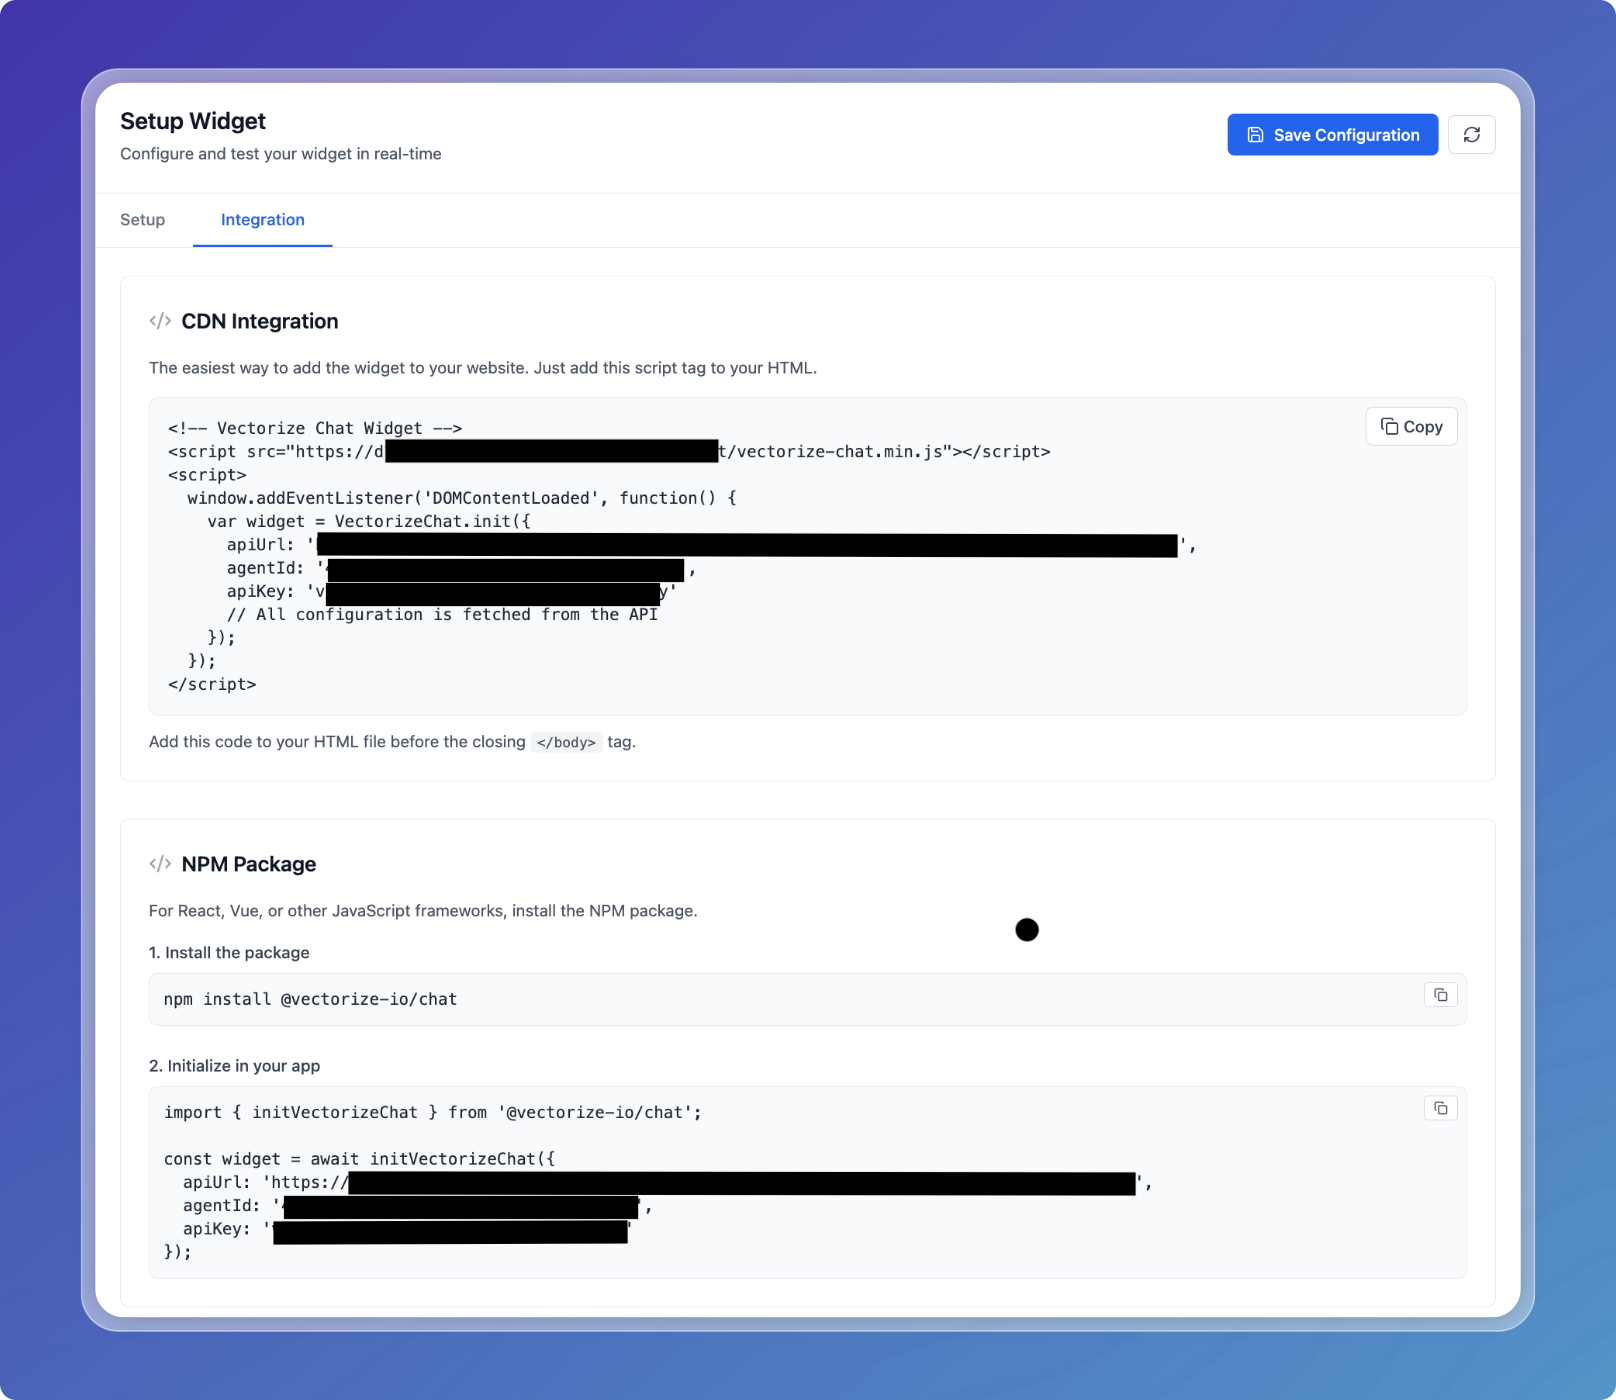
1. Get Embedding Code
Navigate to your widget's details page and look for the Integration tab.

2. CDN Embedding
This is the easiest way to embed your widget to your website. Just add the provided script tag to your HTML.
Add the code to your website's HTML, ideally before the closing </body> tag:
3. NPM Package
For React, Vue or other JavaScript frameworks, you can install the Vectorize widget package:
npm install @vectorize-io/chat
Initialize the widget in your app:
import { initVectorizeChat } from '@vectorize-io/chat';

const widget = await initVectorizeChat({
  apiUrl: 'https://agents-staging.vectorize.io/api/chat/agents/AGENT_ID',
  agentId: 'AGENT_ID',
  apiKey: 'apiKey'
});
Widget Admin Dashboard
After creating your widget, you can access a comprehensive admin dashboard to configure and manage all aspects of your widget.
Accessing the Admin Dashboard
- Navigate to your widget agent's details page
- Click Launch Admin Dashboard
- Sign in with the admin credentials you created during setup
The admin dashboard provides centralized control over your widget's behavior, appearance, and security settings.
Admin Panel Sections
Setup Widget
The Setup section provides everything you need to integrate your widget into your website.
Installation Resources:
- Widget ID: Your unique widget identifier
- API Key: Anonymous API key for widget authentication
- Integration Code: Copy-ready embed scripts for different platforms
- Test Widget: Preview your widget configuration before deployment
Available Integration Methods:
- CDN Script: Simple HTML script tag for quick integration
- NPM Package: For React, Vue, and other JavaScript frameworks
- iframe Embedding: Direct iframe integration for maximum control
Configuration Verification:
- Test your widget directly from the admin panel
- Verify tool connections are working
- Check response generation
- Preview appearance settings
Languages
Configure multilingual support for your widget to serve a global audience.
Language Settings:
- Default Language: Set the primary widget language
- Personal Language Preferences: Allow users to select their preferred language
- Available Languages: Enable/disable specific languages
Translation Management: For each enabled language, customize:
- Widget Heading: The title shown in the widget header
- Welcome Message: Localized greeting text
- Button Text: The launcher button label
- Placeholder Questions: Language-specific suggested questions (up to 3)
Content & Prompts
Fine-tune your AI model's behavior and capabilities.
System Prompt Configuration:
- Define detailed instructions for the AI's behavior
- Set personality and tone guidelines
- Specify knowledge boundaries
- Include escalation instructions
Model Parameters:
- Temperature (0-2): Control response creativity
- 0-0.3: Highly focused, consistent responses
- 0.4-0.7: Balanced creativity (recommended)
- 0.8-2.0: More varied, creative responses
- Max Tokens: Set response length limits (up to 128,000)
Interaction Features:
- Feedback Collection: Enable thumbs up/down on responses
AI Safety and Ethics
Implement content moderation and safety measures to protect users.
AI Consent Management:
- Require AI Consent: Show disclosure before chat begins
- Consent Message: Customize the consent prompt
- Consent Storage: Track user consent acceptance
Threat Detection:
- Enable Detection: Activate automatic threat monitoring
- Detection Sensitivity: Adjust threat detection thresholds
- Actions on Detection:
- Log only (monitor without action)
- Warn users with customizable messages
- Temporarily disable after warnings
- Permanent account suspension
- Warning Thresholds:
- Warnings before temporary penalty (default: 3)
- Warnings before permanent disable (default: 5)
- Penalty Duration: Set temporary suspension length (minutes)
Abuse Prevention:
- Enable Abuse Detection: Monitor for harassment and inappropriate content
- Sensitivity Levels:
- High: Strict filtering for family-friendly environments
- Medium: Balanced approach for general use
- Low: Minimal filtering for adult audiences
- Response Actions:
- Log incidents for review
- Block message and warn user
- Escalate to human moderator
- Custom Blocked Terms: Add specific words or phrases to block
Manage Users
Control access and permissions for widget administrators.
User Management Features:
- View Admin Users: See all users with admin access
- Add Administrators: Grant admin access to team members
- Email invitation system
- Role assignment (Admin, Viewer)
- Permission customization
- Remove Access: Revoke admin privileges
- Activity Monitoring: Track admin actions and changes
User Roles:
- Admin: Full access to all settings and configuration
- Viewer: Read-only access to analytics and logs
- Custom Roles: Define specific permission sets
Access Controls:
- Password requirements and policies
- Session timeout configuration
- IP allowlisting for admin access
- Multi-factor authentication options
Security
Configure authentication and security settings to protect your widget.
Authentication Methods:
- Password Authentication:
- Standard username/password setup
- Password complexity requirements
- Password rotation policies
- SAML/SSO Integration:
- Enterprise single sign-on
- Identity provider configuration
- Attribute mapping
- Two-Factor Authentication (2FA):
- Email-based verification
- TOTP (Time-based One-Time Password)
- Backup codes generation
Session Security:
- Session Timeout: Auto-logout after inactivity
- Concurrent Sessions: Limit simultaneous logins
- Device Tracking: Monitor logged-in devices
- Force Logout: Remotely end user sessions
Data Protection:
- Encryption: End-to-end encryption for messages
- Data Retention: Set automatic data deletion schedules
- Audit Logging: Track all security events
- Export Restrictions: Control data export capabilities
Branding
Customize the visual appearance to match your brand identity.
Logo Configuration:
- Wide Logo: Desktop header logo (recommended: 200x50px)
- Light mode version
- Dark mode variant
- Square Logo: Mobile and compact views (recommended: 64x64px)
- Light mode version
- Dark mode variant
- Logo Upload Requirements:
- Supported formats: PNG, JPG, SVG
- Maximum file size: 2MB
- Transparent backgrounds recommended
Branding Options:
- Hide "Powered by Vectorize": Remove attribution (paid plans)
- Custom Color Scheme: Override default colors
- Font Selection: Choose from available font families
- Custom CSS: Advanced styling with CSS injection
Theme Settings:
- Light/dark mode configuration
- Auto-detect system preference
- Custom theme creation
- Mobile-specific styling
Webhooks
Set up real-time integrations with external systems.
Webhook Configuration:
- Endpoint URL: Your server's webhook receiver
- Authentication:
- Bearer token
- Custom headers
- HMAC signature verification
- Retry Policy:
- Maximum retry attempts (1-5)
- Retry delay intervals
- Exponential backoff options
Available Events:
- Conversation Events:
- Conversation started
- Conversation ended
- User authenticated
- Message Events:
- Message sent by user
- Response generated
- Tool executed
- Feedback Events:
- Positive feedback received
- Negative feedback received
- Feedback comment added
- Error Events:
- API errors
- Tool execution failures
- Rate limit exceeded
Webhook Testing:
- Send test payloads
- View recent webhook deliveries
- Inspect failure reasons
- Replay failed webhooks
Payload Format:
{
  "event": "message_sent",
  "timestamp": "2024-01-15T10:30:00Z",
  "widgetId": "widget_123",
  "conversationId": "conv_456",
  "data": {
    "message": "User's question",
    "userId": "user_789",
    "metadata": {}
  }
}
Logs
Monitor widget activity and troubleshoot issues.
Error Logs:
- Real-time Error Monitoring: View errors as they occur
- Error Categories:
- JavaScript errors
- API failures
- Tool execution errors
- Authentication failures
- CORS violations
- Error Details:
- Full stack traces
- User context
- Browser information
- Request/response data
- Export Options: Download logs for analysis
Activity Logs:
- Conversation history
- Tool usage statistics
- User interactions
- Admin actions
- Configuration changes
Log Management:
- Retention Settings: Configure log storage duration
- Search and Filter: Find specific events or errors
- Alert Configuration: Set up notifications for critical errors
- Export Capabilities: Download logs in CSV or JSON format