Zoom
Zoom Source Connector
The Zoom Source Connector allows you to integrate transcripts from your personal Zoom cloud recordings as a data source for your pipelines. This connector retrieves meeting transcripts and metadata from your Zoom account, without storing or processing the actual video or audio recordings.
Prerequisites
Before starting, you'll need:
- A Zoom account with cloud recording capabilities
- Cloud recording enabled in your account settings
- Audio transcription enabled in your cloud recording settings
Usage - Common Use Cases
Meeting Intelligence and Analytics
Use Case: Extract insights, action items, and key decisions from team meetings automatically.
Prerequisites:
- Regular team meetings recorded to the cloud
- Audio transcription enabled in Zoom settings
- Metadata schemas configured in Vectorize for structured extraction
Compliance and Quality Monitoring
Use Case: Monitor meeting transcripts for compliance keywords, sensitive information, or quality assurance in customer calls.
Prerequisites:
- Cloud recording enabled for monitored meetings
- Compliance keyword lists or patterns defined
Knowledge Base Creation
Use Case: Build a searchable knowledge base from training sessions, webinars, and all-hands meetings.
Prerequisites:
- Systematic recording of knowledge-sharing sessions
- Consistent meeting naming conventions
- Vector database configured for semantic search
Adding the App - Authorization Steps
Adding the Vectorize app to your Zoom account is handled through OAuth authorization during the connector setup process:
Step 1: Create a New Source Connector
- Navigate to Source Connectors from the Vectorize main menu
- Click New Source Connector
- Select the Zoom card from the available connectors
Step 2: Authorize Zoom Access
- Enter a descriptive name for your integration (e.g., "Sales Team Meetings" or "Company All-Hands")
- Click Authorize
- You'll be redirected to Zoom's authorization page
- Review the requested permissions:
- View and manage cloud recordings
- View meeting information and transcripts
- Click Authorize in Zoom to grant access
- You'll be redirected back to Vectorize to complete the setup

⚠️ Important: Due to Zoom's API limitations, each Zoom account can only maintain one active connection at a time. Connecting this account to a new connector will immediately disconnect any existing connector using the same account, which may cause pipeline failures.
Verifying Successful Authorization
After successful authorization, you'll see a blue "Connected" status in place of the authorization button, confirming that Vectorize can now access your Zoom recordings.
Configuring the Zoom Connector in a Pipeline
When configuring the Zoom connector in a pipeline, you can specify the following options to filter the recordings that will be ingested:
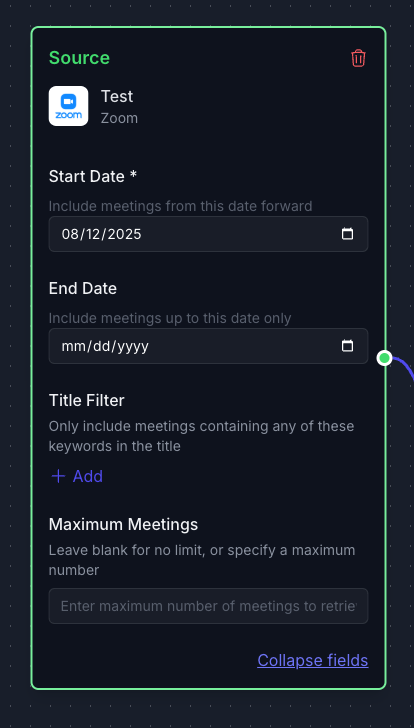
| Field | Description | Required |
|---|---|---|
| Start Date | Only include meetings from this date forward. Format: YYYY-MM-DD. | Yes |
| End Date | Only include meetings up to this date. Format: YYYY-MM-DD. | No |
| Title Filter | Only include meetings with specific text in the title. Toggle between AND/OR for multiple entries. | No |
| Maximum Meetings | Maximum number of meetings to retrieve. Leave blank for no limit. | No |
Removing the App
De-authorization Steps
To remove the Vectorize app's access to your Zoom account:
Primary Method: From Vectorize
- Navigate to Source Connectors in Vectorize
- Find the Zoom connector with your connected account
- Click the Delete button for that connector
- Confirm the deletion when prompted
Note: Deleting the connector automatically disconnects your Zoom account from Vectorize. Connectors in active pipelines cannot be deleted.
Alternative Method: From Zoom Account Settings
If you prefer to revoke access directly from Zoom:
- Log into your Zoom account at zoom.us
- Navigate to Settings → Advanced → App Management
- Find "Vectorize" in your authorized apps list
- Click Disconnect or Remove
- Confirm the removal
Data Removal and Privacy
When you disconnect the Vectorize app from your Zoom account:
- Immediate effects:
- Vectorize immediately loses access to your Zoom recordings and transcripts
- No new meeting data will be ingested
- Data retention:
- Previously processed vector embeddings remain in your destination database
- No video or audio recordings are ever stored by Vectorize
- Only transcript text was processed, and only embeddings are retained
Troubleshooting
Quick Troubleshooting Checklist
If your Zoom connector is not retrieving meeting data properly, check:
- Cloud recording enabled: Verify in Zoom Settings → Recording → Cloud Recording
- Audio transcript enabled: Check "Audio transcript" is checked in cloud recording settings
- Authorization status: Look for green "Connected" status in Vectorize connector settings
- Date range: Ensure your date range contains meetings that were actually recorded
Common Issues and Solutions
Authorization Errors
- Error: "Invalid access token"
- Solution: Re-authorize the connector by clicking "Reconnect" in connector settings
- Error: "Insufficient privileges"
- Solution: Check your Zoom account has required permissions
Data Retrieval Issues
- No recordings found:
- Not all meetings are recorded - check your recording settings
- Recordings may be deleted after retention period (check Zoom admin settings)
- Missing transcripts:
- Transcripts take 2-4x meeting duration to process after meeting ends
- Verify "Audio transcript" is enabled in recording settings
- Some languages may not support automatic transcription
For further assistance with the Zoom connector, please contact Vectorize support through the Intercom chat in the Vectorize console.
What's next?
If you haven't yet built a connector to your vector database, go to Connect Your Data and select the platform you prefer to use for storing output vectors.
OR
If you're ready to start producing vector embeddings from your meeting transcripts, head to Pipeline Basics. Select your new Zoom connector as the data source to use it in your pipeline.